Fantasy/Gothic Inspired Floor Mirror| Stained Glass + Wood Build!
Mirror, Mirror, on the wall, who’s the DIY’est of them all!?

I needed a mirror for my studio, and with my new stained glass hobby, I had the perfect project to practice. But I didn’t want any old mirror, I wanted one that’s out-of-this-world magical... quite literally. Follow along for my stained glass mirror build!
Watch this Episode
Shop this Episode


Specialty Tools:
Compass – For drawing arcs and creating precise shapes.
Plunge Saw – Ideal for straight cuts on wood or plywood, a must-have for DIY woodworking.
Jigsaw – Perfect for cutting intricate patterns or shapes in wood and glass for your mirror frame.
Hand Saw – Great for finishing cuts on wood, a must-have tool for DIY carpentry projects.
Drill with Hole Saws (6” and 4” sizes) – For cutting precise holes in wood projects.
Soldering Iron – Essential for assembling stained glass pieces and creating strong seams in your DIY stained glass mirror.
Glass Cutter – The key tool for cutting stained glass pieces to fit your unique design.
Grinder – Used to smooth and shape your stained glass edges to ensure a polished look.
Copper Foil – A key component for framing stained glass and ensuring it stays together.
Patina Solution – Darkens copper solder, giving your stained glass a vintage or antique finish.
Supplies/Materials:
¾” Plywood – Used for the main structure of your mirror frame and a solid base for your DIY mirror.
¼” MDF – Essential for creating templates or molds for intricate designs in your DIY stained glass mirror.
Flexible Trim – Adds a decorative edge to the mirror
Wood Half Circles – These can be used as decorative elements for added visual interest in your wood frame.
Leaf Trim – Perfect added decoration
Corner Squares – Decorative corner accents for a polished look.
Hand-Rolled/Mixed Glass – Used for DIY stained glass work, great for creating unique, celestial designs.
Stained Glass (Cosmic & Celestial Patterns) – Choose vibrant, cosmic stained glass to achieve a galaxy-inspired mirror.
Soldering Copper – Ensures your stained glass pieces stay in place securely.
Primer & Paint – Essential for painting your frame, especially if you're using a black sapphire paint for a celestial touch.
Danie-Core
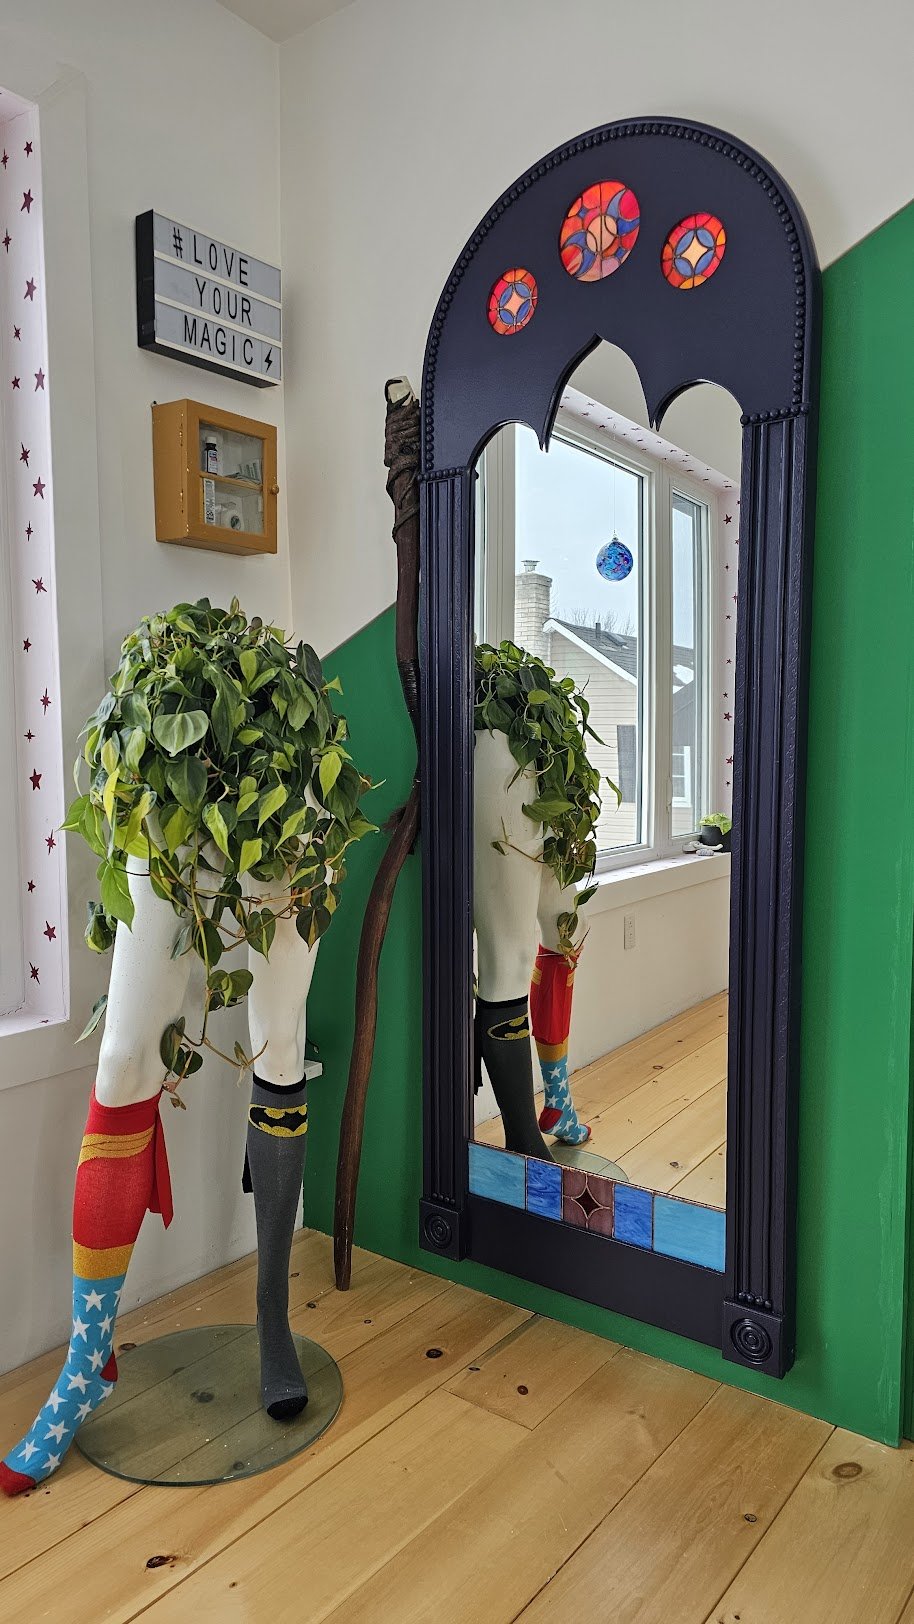
Before I could even think about cutting plywood or picking out glass, I had to first figure out what kind of mirror I wanted. After much contemplation, I decided to blend some of my favorite aesthetics: gothic fantasy, whimsical touches, and just a dash of witchcore (yes, that's a thing). And because I am who I am, I officially coined this style Danie-Core—a fun and funky mix of fantasy and magic, with a touch of sophistication. Think cathedral arches, stars, moons, and a whole lot of DIY magic.
I had this vision of an arched mirror, soft yet structured, adorned with stained glass celestial elements. The design took shape in my mind as three windows at the top, but as the project evolved, I decided to soften the lines and experiment with my designs. No surprises here—I wasn’t going for perfect. I was going for enchanting.

Day 1: Woodworking
I started with some leftover plywood (because, waste not, right?) and set out to create a structure that felt as whimsical as it was functional. There were a lot of “I don’t know if this is going to work” moments—trials with arches, cutting lines, and fiddling with measurements.


Let me tell you, cutting arches isn’t a simple task, but my large compass quickly became my best friend.
Once my arches were established, I used my plunge saw to cut out the outline in the plywood. I then used my jigsaw and router to cut out the details. A drill with a circular saw attached helped make the perfect circles I needed for the holes at the top that would eventually hold my stained glass.


With the frame cut, I then had to bring my design details to life. Some decals, primer, and paint did the job. I opted for a combination of trim adhesive and wooden half-balls to enhance the mystical feeling of the mirror.


Day 2: Stained Glass
With my frame decorated, it was time to move on to the mirror. I’ve been wanting to dive deeper into stained glass for a while now, and this project gave me the perfect excuse. I had already stocked up on mirror glass from a local shop, and it was finally time to put it to use. I was inspired by celestial themes, so I went with a gorgeous moon design and some cosmic elements with stars that I got from @MayberryGlassDesign and @LuckyCatGlassWorks on Etsy!


Day 3: Soldering and Copper
Once I had my pieces ready, I painstakingly foiled and soldered them, adding patina to give it that antique bronzed look. Soldering, for me, is where the real magic happens.

There’s something almost hypnotic about watching copper solder melt and fuse into place. As the solder took on its deep, rich color, I felt like a wizard casting a spell over my mirror. It was the final touch that turned a simple piece of stained glass into something truly enchanting.Whatever it is, the way you tell your story online can make all the difference.
Once I had my pieces ready, I painstakingly foiled them, adding a patina to give it that antique bronzed look.


Day 4: The Final Touch
After all that hard work, it was time to assemble the mirror and see the celestial magic unfold. I included my stained glass art, carefully attached the mirror, added support brackets, and gave the whole piece a finishing touch with dark silicone to seal it.

The Reveal
So, what do you think? The mirror now hangs proudly in my studio space, reflecting not only my work but also the journey it took to create it. To finish off the mystical vibe, I added LED lights behind it for that extra celestial glow. The result? A mirror that feels like a portal to another world.

I may have set out to create a mirror, but what I really ended up with was a piece of art that reflects the magic of DIY in Progress—the magic of creation, the magic of getting lost in a project, and, of course, the magic of Danie-Core.
As I always say, DIY isn’t just about the finished product—it's about enjoying the process, learning from every step, and finding magic in the mess. And now, with my celestial mirror shining in the studio, I’m ready for my next creative adventure.