
DIY Upholstered Ottoman and Live Edge Waterfall Table Duo
Welcome back, DIY friends! I'm in the middle of a living room refresh, and it was time to find a new coffee table to fit the new and improved space. I decided to build a custom coffee table/ottoman combo that not only serves coffee, but comfort and a beautiful aesthetic as well! Learn how I built an upholstered ottoman with a gorgeous live edge table complement, and see if it inspires you to create something like it for your own living room space!
Is it better to have a coffee table or an ottoman?
I decided that my old coffee table didn't work well in my new space. To figure out the best direction to take, I asked my husband what he wanted most out of a coffee table. His answer: "a comfy place to put my feet up". So, my first thought was to make my own ottoman coffee table with a cushy top. But then I thought about how we like to eat dinner in the living room (from time to time) and we use the coffee table to serve food. A solid tabletop would be ideal for that! These were two apparently opposite functions that were equally important. So, what to do? I decided...let’s do both. There's no reason to choose between an ottoman and a coffee table! All it takes is a creative design.

Designing my DIY ottoman coffee table
To create a piece of furniture I truly loved, I thought about what I liked about the old table. After all, I had chosen it for the space for a reason! I realized what I would miss most about it is the live edge wood. I think it really feeds into the organic vibe that I love so much in my living room. I decided to make a coffee table/ottoman combo by building the main piece as a long upholstered ottoman for the comfy factor. Then I needed to add a functional hard topped table feature that would keep that organic element I loved about the old table going in the space. I decided to find a slab of live edge wood, cut it into three pieces, and build a little table with waterfall edges that would nest over top of the finished ottoman. I pictured this little table being able to live independently from the ottoman off to the side, or sliding on top of the ottoman to help with the dual goal of function and comfort in one piece of furniture.

Brilliant, right?
Materials for the table and ottoman builds
I bought a beautiful live edge slab of Catalpa hardwood from a local lumber yard. It was the right width and thickness (1 3/4"), and I loved all the different colors of the grain. I knew it would be beautiful as part of a waterfall effect. The entire thing was already planed and ready to go, so all I would have to worry about was sanding! It definitely had some character knots and grooves, but that adds to the beauty of it.

For the large ottoman part of the build, the wood pieces I needed were less exciting! I decided to use a 4x8 sheet of builder grade plywood and a 4x4x8 post.
Tools and Materials List
Here's a detailed list of everything I needed to build the coffee table/ottoman of my dreams:
The ottoman
4x8 sheet of plywood
4x4 post
Painter's tape
Wood screws
Furniture feet
Plunge saw with track (you could use a table saw or miter saw too)
Impact driver
Clamp
The upholstery
Batting
Upholstery fabric (end of the roll discount if you can! I chose a beautiful green)
2" foam
Spray adhesive
Piping cording
Black cotton
Scissors
Staple gun
Hammer
Needle and upholstery thread
The table
Slab of hardwood (I used live edge Catalpa)
Epoxy
Coloured pigment (if needed. I used chestnut brown tint)
Tyvek tape
Plywood scraps (for a jig to hold the table pieces together)
Wood screws
Wood glue
L-brackets
Walnut wood stain
Hammer
Chisel
Grinder (and 80-grit disc)
Sandpaper of various grits (80-100-120-150-180)
Orbital sander
Pencil
Plunge saw
Mixing containers
Small wooden stir sticks
Small torch
Planer
Triangle square
Impact driver
Foam brush
Level
Watch How I DIY My Coffee Table Ottoman
Building the ottoman
The first thing I needed to do was cut the pieces for the ottoman box. This was the first time I was using my brand new plunge saw with a track, and it was so exciting! This saw makes it really easy to get a clean cut with a perfectly straight line, which was great for cutting up a large piece of plywood. I cut six pieces of plywood to be my top, front pieces, side pieces, and top support that I used to secure the top to the base.

Then, I cut the 4x4 post. I cut four pieces. Each one would serve as a heavy duty post to sit inside my box in each corner for support and as a base to add my furniture feet to.
I put my box together as a dry fit situation (held together by painter's tape!) just to make sure I liked how it looked and that I had cut everything properly before I committed to fastening it together. I sandwiched the two end pieces between the sides. There was a 4x4 post in each corner on the inside for extra support. And then I cut another piece of plywood that fit between the 4x4 posts on the bottom of the box to serve as the "spine" of the top. (If that seems confusing, let me explain that I built the box "upside down" and the finished product will be flipped.) The spine piece adds structural support to the top of the box but it also gave me a way to secure the cushion top to the base from underneath. I also cut a piece of plywood to serve as the top of the box and made sure it fit just right.

Once I knew the pieces fit together the way I wanted them to, it was time to fasten them together. I got out my wood screws and impact and began to really make my DIY ottoman project come to life. The first step was pre-drilling the pilot holes. Then, I attached the corners of the first end and and front pieces to the first post. I worked my way around the rest of the ottoman using a clamp at the top of the post to keep it in place while I screwed in the boards. The nice thing about this project design is that I didn't have to worry about exposed screws, since the plywood was all going to be covered with upholstery.
The last thing I did to the box was add the feet to the bottom of the posts so the ottoman would be up off the ground while I worked on the next step.
Upholstering the ottoman
The upholstery was up next! I didn't have a huge budget. So, I contacted a local upholstery company and asked if they had any small amounts of fabric left over from recent sales or projects. They said yes! I went in and found a fabric I liked and they gave me the end of the roll for a very big discount. So, do your research! There is no additional cost to calling around and asking upholstery places for leftovers. You can also check out Facebook Marketplace for people selling upholstery scraps. Even a large ottoman is a very small thing to cover and you don't need much fabric. You might just get lucky and find the perfect material for a fraction of the cost!
First up was attaching the batting material to the plywood base of the ottoman. Spoiler alert: I'm not a professional upholsterer, ok? But I got the job done. I rolled the batting out to cover the sides and ends of my box (flipped the right way up) and nailed it down using my staple gun along the edges of the wood. I simply cut off any excess batting at the top. I didn't worry about creating a seam halfway through a board if I needed to start a new piece, since it would all be covered by my fabric. This part of the project is very forgiving.

Then, it was time to add a layer of fabric to the batting material. I measured and cut it and then got to work with my staple gun. Unlike some other projects, it's totally OK to use extra staples here. They will not be visible and the most important thing is getting your fabric as tight as possible. If a million staples helps you do that, go ahead! Once I was done stapling I cut the excess fabric off and called it good. Once I finished the top of the box and had to flip the box to staple the bottom edge, I took the feet off to make it easier to work around the post.
Creating the cushion top
To make the top of the ottoman, I used 3/4" plywood and a piece of 2" upholstery foam. I went with a firm foam to create a semi-hard surface, since I wanted to be able to put my feet or a tray on the ottoman and still have it retain its shape.

I placed the plywood on my work table and sprayed it with a little spray adhesive. Then I added the foam, and then a piece of batting cut larger than the surface area of the foam and plywood. Then I flipped it over and stapled the edges of the batting to the bare plywood of what would become the bottom of the cushion. When it was attached, I used scissors to cut the excess material off.
Then, it was time for the fabric! I laid the top face down (bare plywood up) on top of the fabric and cut around it with enough material to spare to wrap around the edges. Then, I stapled it using my staple gun in the same way that I did the batting. During this process, you can use a hammer to bang in any staples you think might not be in the wood securely. When I was finished, I cut the excess fabric off with the same pair of scissors.
Creating a finished pillow top look
Up till now, details haven't mattered much in my upholstery process. I have estimated material length, used a million staples, and cut off whatever fabric seemed extra at the edges. But I wanted the finished visible edge of my pillow to look as professional as possible. This meant finding a way to create a "transition piece", if you will, between the base of the ottoman and the pillow itself.
I found a really simple way to create this look. I took a thin strip of fabric and placed it right side down on the plywood. Then, I folded it over on itself so that it was doubled. I placed the fold (remember, the right side of the fabric facing out) right at the edge of the base, pointed out. This gave the pillow the appearance of a seam, just like a fancy ottoman from a store would have! When the seam was in place I used my staple gun to tack it down, cutting the excess fabric off as I went.
Putting it all together
Once the seam was done, it was time to attach the cushion top to the base! I put the box upside down on the underside of the cushion I just made and put screws through the "spine" piece and into the cushion. Then, all along the outside edge of the bottom of the ottoman I added piping cording by hand with a needle and thread to get a nice clean edge. The last step was to add a layer of black cotton to the bottom with my staple gun and re-attach the legs.

Making the live edge table
Prepping the surface
Now it was time to tackle the second part of this project: the table. I started by using a hammer and chisel (and then my disc grinder with an 80 grit wheel) to remove the bark from the edges of the board.
Next was the sanding! This is a very tedious but also a very necessary part of the project. For the best finish possible, it is important to work through your sandpaper grit levels. Let your orbital sander do the work for you (gently hold it and guide the direction, don't put pressure on it), and just be patient with the process. This was my sandpaper order (that I recommend for you as well): 80-100-120-150-180. Before I sanded with each grit, I drew a light pencil squiggle across the whole board so I could see where I had and hadn't sanded. I knew I was done sanding when there was no pencil line left! This took a few hours.

Making my cuts
I really wanted to highlight the gorgeous grain pattern in this beautiful piece of Catalpa hardwood, and I knew the best way to do that was to waterfall the edges to provide a continuous unbroken line. To get this waterfall effect, I needed to make cuts at a 45 degree angle. I would need to make one cut, and then flip the end piece over and make another cut in the opposite direction so the two 45 degree angles matched. My plunge saw cuts at an angle so I used it for this part of the project too. I used it first to cut off the end to provide a squared off starting point. My saw blade was not quite deep enough to cut through the entire thickness, so I had to make the first cut and then flip the board over and run the saw through the same cut again to finish it off. I went through this process three times to get my three pieces of wood that I would need for the table.


Playing with epoxy
Some of the knots and grooves in the board were very deep and would have affected the structure and function of the table, so I decided to fill them with epoxy. I used a product with a Part A and Part B that you mix in a 1:1 ratio when you're ready to apply it. I I also added a chestnut brown pigment to dye the epoxy instead of keeping it clear. I thought it would give my wood the honey-brown tone I wanted for the piece. Here was my process for filling the grooves with epoxy:
I used Tyvek tape to tape off the ends of the grooves where I didn't want epoxy to leak through.
Then I mixed my epoxy and added the brown pigment for color.
Next, I poured the epoxy mixture into the first groove (this may need to be done in multiple small pours depending on your epoxy)
I used a small torch to remove the air bubbles.
I repeated steps 3 and 4 for every knot and groove I wanted to fill.

Once the epoxy was dry, I sanded the epoxy sitting on top away until my top was smooth and the epoxy was flush with the wood grain.
Putting the pieces together
I struggled a bit with how to put my table pieces together. I think most people would have used a biscuit joiner or dowel system with pocket holes. But, I already blew my new power tools budget on my amazing plunge saw (no regrets), so I needed a different solution. I created a jig (woodworking jargon for template) out of leftover pieces of plywood to hold my boards in an "L" position.
I placed the top of my table upside down between the two upright boards of my jig. I added a high-quality wood glue with a brush, and then I added the outside pieces to the edges. I also added L-brackets for extra security. I used a level across the top of both pieces of upright wood to make sure everything was still square, and thankfully, it was! I let it dry for a few hours to make sure the glue was as strong as it could possible be.


Once I was confident the glue was dry, I took my table out of the jig, sanded the joined edges smooth, and applied a coat of walnut colored oil. The oil made the wood grain look so striking, and the color blended perfectly with the dark-tinted epoxy. I could not be more thrilled with how this gorgeous little waterfall table turned out. And it's the exact size to fit perfectly over top of the ottoman, just as I had planned!
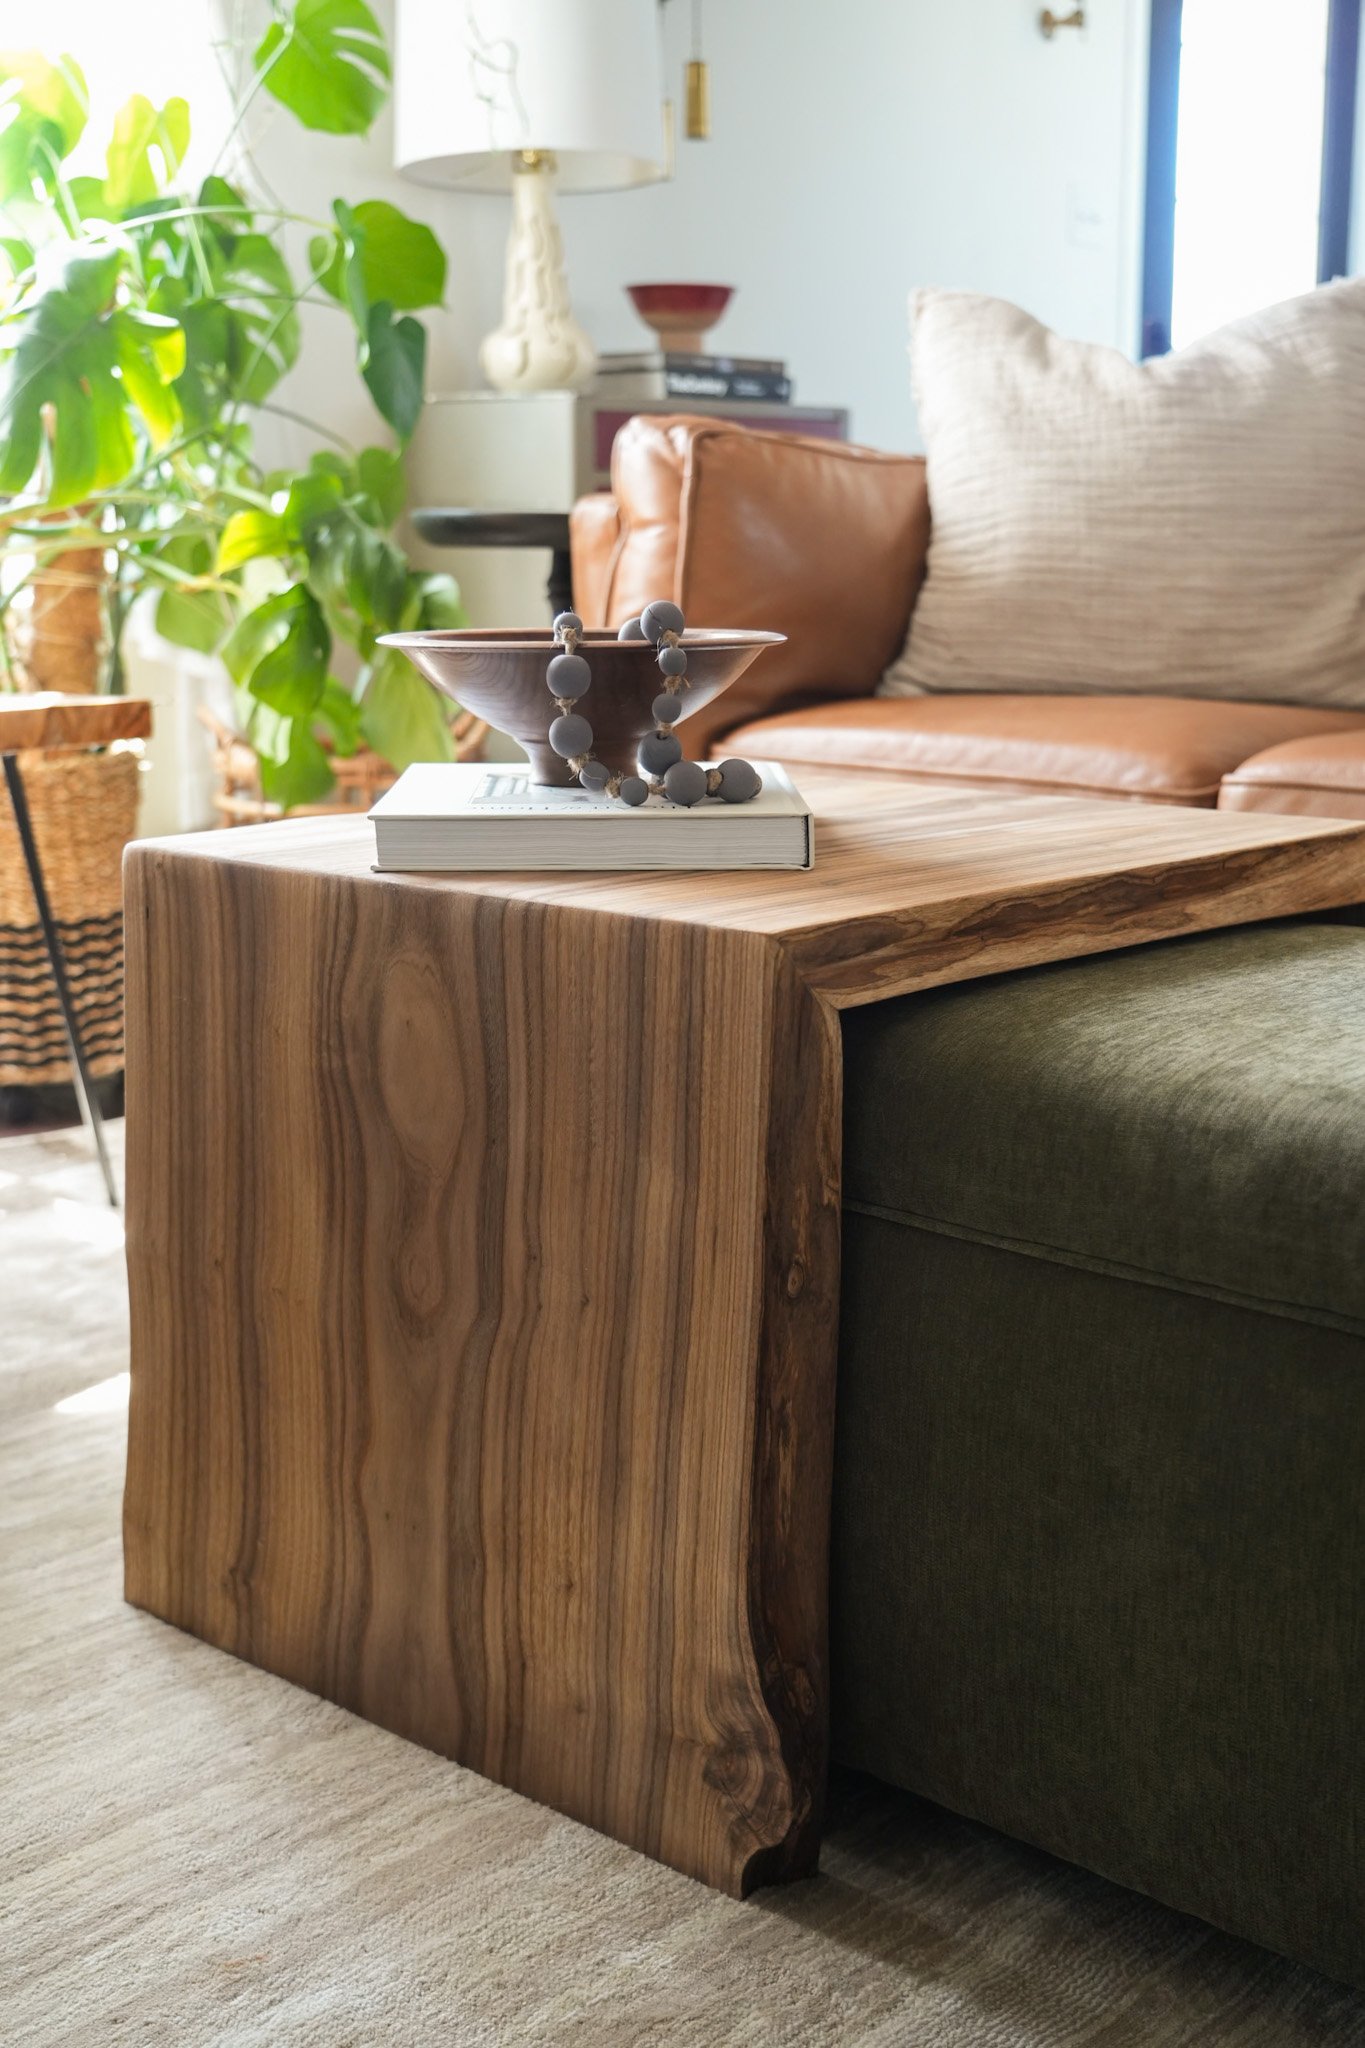


I absolutely love how this beautiful ottoman and quirky live wood table combo turned out! The pop of colour the green gives the room is absolutely perfect. And I will never get tired of staring at the contrast of the gorgeous wood grain against the upholstery fabric. This ottoman is beautiful enough to be a decor piece but also sturdy enough to serve as a table or extra seating if necessary, which is just perfect for my space. I love the whole thing, period! Let me know if you agree in the comments, or post a pic of your own DIY living room furniture or accents! You can also tag me @diydanie, I would love to see your creations.
