6 Budget Friendly DIY Upcycled Lamps
Overhead lighting? Not in my world. Cozy, moody lamps? Absolutely! In this episode, I’ll show you how easy (and budget-friendly) it is to DIY your own unique lighting because cute lamps can be pricey—but my creativity is limitless! I'll be turning unexpected items into lamps, showing you six different styles so there's a perfect one for everyone. Let’s light up your space the DIY way!

Shop this Episode


Specialty Tools Used:
Lamp kit (brass light socket, threaded nipple, brass washer, locknut, cork stopper, 9” brass harp with saddle)
Drill with 3/8” bit
superglue
Threaded nipple
Light cord
Nail gun or hammer and nails
Lamp #1: Modern Organic Lamp with Rechargeable Bulb
I was shopping when I found a beautiful wood vase and thought, “this could be the perfect lamp base!” In the shopping cart it went.

I retrofit my lamp base with a lamp-kit from Home-Depot, added an oatmeal toned tapered-shade, and a rechargeable USB bulb. The USB bulb is a stress and mess-free option when making lamps, and an easy beginner-tool for those DIYers that aren’t familiar with electrical yet. Plus, it comes with a remote, how fun!

Materials:
Wooden base (thrifted or purchased) - $25
Lamp kit (brass light socket, threaded nipple, brass washer, locknut, cork stopper, 9” brass harp with saddle, cord connection) $24.98
Lamp shade - $20
Rechargeable bulb - $15
Tools:
Drill (if needed to widen hole for cork base)

Steps:
Insert the cork stopper into the hole at the top of the wooden base.
Twist the threaded nipple into the cork.
Add the brass washer and harp saddle, then screw on the lamp socket.
Attach the lampshade and bulb.
Our Cost: $85 vs Retail Cost: $249


Lamp #2: Wavy Glass Lamp with Rechargeable Bulb

I stumbled across another uniquely shaped base while shopping! Originally a bubble-style glass vase, it’s now been transformed into a stunning lamp. The green, bulb-like glass gives it a fresh, modern feel, perfect for adding a contemporary pop to any space.Since this is a vase with a wide hold at the top, I needed a base to build the saddle and harp on. The solution? A mason jar lid for 25 cents!
Materials:
Mason jar lid - $0.25
Glass vase or jar - $12.99
Lamp socket with a side-exit cord - $6.98
8 inch harp: $6.98
Super glue
Lamp shade- $16.98
Rechargeable bulb- $15.00
Tools:
3/8” Drill Bit
Drill
Steps:

Drill a hole in the mason jar lid using a 3/8th sized bit.

2. Insert a small threaded nipple
into the lamp socket base

3. Feed the nipple through
the hole, securing with
a locknut.

4. Super glue the mason jar base to the top of the vase. I used a super glue/accelerator combo that dried the glue in 10 seconds.

5. Add the shade and rechargeable light bulb!
VOILA! We have a funky lamp fit for the shelves of any trendy store.
Our Cost: $60
Lamp #3: Eclectic Floral Wood Bowl Lamp
Lamp number 3 might cause some raised eyebrows. Has anyone turned a bowl into a lamp before? Well I found a massive wood bowl at a thrift store and thought, “now that’s a lamp base!” The wood is a cozy rich brown, and it has a dark flower etched into the wood. Is it a little large for a lamp base? Yes. Could it make a really cool lamp? Also yes! I decided to go the more traditional route with this lamp and use a real lightbulb instead of a rechargeable one.


Materials:
Second Hand Wooden bowl- $8.99
Lamp kit (brass light socket, threaded nipple, brass washer, locknut, cork stopper, 9” brass harp with saddle, cord connection) - $24.98
Lamp shade - $20
Bulb - $0.96
Tools:
Drill with 3/8” bit
Steps:
Drill two holes in the lamp base. Drill one hole at the top centre and a second hole in the back for the cord exit.


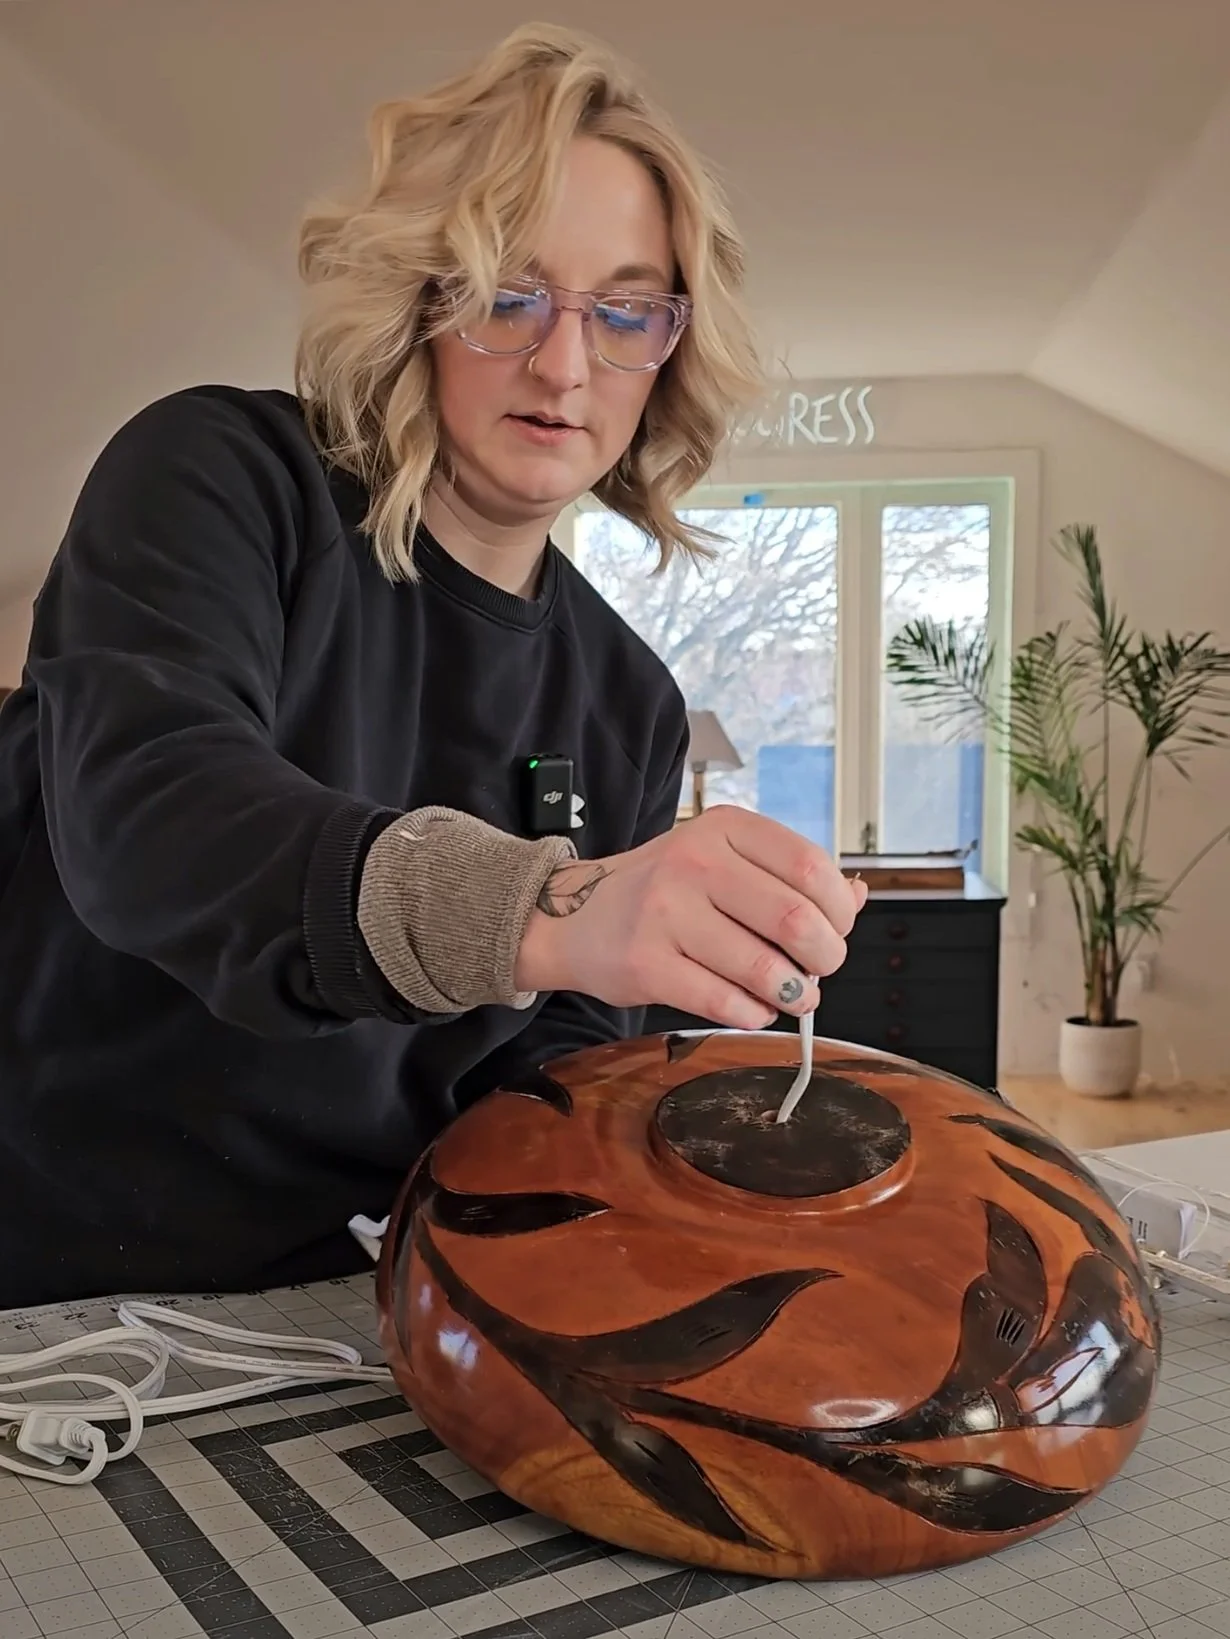
2. Thread the cord up through the holes, securing with a threaded nipple on the top and a locknut on the bottom.

3. Connect the hot and neutral wires to the lamp socket.
4. Attach spacers, harp, shade, and bulb.
Now we have a cozy eclectic lamp with a large and in charge base!
Our Cost - $55 vs Retail Cost - $148

Lamp #4: Cottagecore Floral Lamp
For my next lamp, I had a very specific dupe in mind. I loved these antique looking lamps from Anthropologie, but I couldn’t justify spending that much money on one lamp.

To the thrift store I went, looking for a sturdy ceramic base.I finally found this cute pink one for only $7.99. I decided to go for a dark base with a decoupage floral shade. With a little sanding and the right spray paint, I knew it would bring my vision to life.
Materials:
Ceramic lamp base -$7.99
Spray paint - $13.97
Mod Podge - $11.65
Decoupage paper or napkins - $19.99
Foam brush -$2
Lamp shade- $16.98
bulb - $0.96
Tools:
Sandpaper (80-grit)
Steps:

Sand the lamp base for better paint adhesion. I used 80 grit.
Apply spray paint. I chose “Wild Raspberry” from Tremclad.
DIY Tip: The key to spray painting is applying light coats in quick bursts, and lots of patience

3. Apply decoupage to shade using mod podge
DIY Tip: decoupage paper can be swapped out for pretty napkins!
The best part? This was already a lamp, so there was no lamp kit needed - only decoration! I love a simple DIY with big impact.
Our Cost - $75 vs Retail Cost - $328


Lamp #5: Grecian Bust Lamp
Grecian busts are all the rage. They are super popular in candle forms, statue forms, and lamp forms. to save my wallet, I’m using a DIY hack. I found a grecian potpourri holder while shopping. With the help of a masonry bit, we can turn this greek lady into a lamp!

Materials:
Medium Lamp harp - $6.98
long threaded nipple - $7.98
Light cord - $7.98
Light socket - $6.98
Tools:
Steps

Using a masonry drill bit, drill a hole in the centre of the bust for the lamp socket.
Insert the long threaded nipple in the centre of the bust

3. Drill a hole in the back of the bust. This will be for the cord exit.

4. Feed the cord through, attach the harp and socket, and connect wires.
5. Feed the cord through, attach the harp and socket, and connect wires.
6. Secure it with a locknut, add the bulb and shade
And she’s complete! In under 15 minutes, we made a gorgeous grecian gal with a whole watt in her head (see what I did there?)
Our cost - $78, Vs Retail Cost - $298

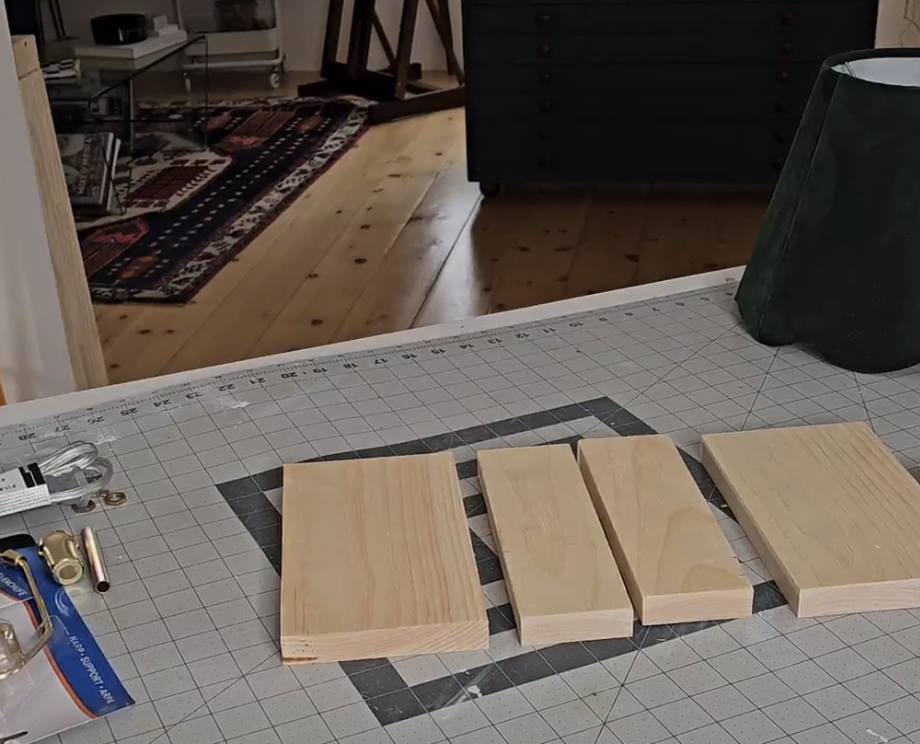
Lamp #6: Green Checkered Lamp
This next lamp might be my favourite one of the bunch. I found this artisanal lamp from Claude. It has such a sleek design with a touch of whimsy. This lamp, however comes with a $1000 price tag. I knew I could make the same thing for cheaper! To pull this one off, I have to make a custom base out of wood.
Materials:
Lamp Shade - 16.99
Harp - 6.98
Cord - 7.98
3” threaded nipple - 3.28
Wood - 16.37
Spray Finish: 13.97
Tools:
Saw (to cut wood pieces)
Nail gun or hammer and nails
Drill with 3/8” bit
Steps

Cut pieces into desired dimensions for base. Assemble wood pieces into a box shape, securing with wood glue. I used a brad nailer for extra security, but you can use a hammer and small nails too.
Drill holes for cord access at the top and bottom with a 3/8th drill bit.

3. Sand the wood and apply wood filler over whole base. The wood filler will act like a primer in order to cover up any impurities and the wood grain so it can’t be seen under the paint!
4. Sand down the wood filler for a smooth base.
DIY Tip: Use a power-sander to save you some time!

5. Get creative with painting!
I applied a white acrylic paint mixed with a dot of brown acrylic paint for the base. Then I mixed green and black to create the checkers. I free-handed them to create an artisanal feeling.
6.Seal the paint with a spray finish to ensure some shine and longevity.
7. Build out the rest of the lamp by adding the saddle, base, bulb, and shade.
And there we have it, my final and favourite lamp!
Our Cost: $98 vs. $1,000+ retail
With a little DIY magic, I made 6 different affordable lamps that are all packed with personality!

