
Skull Chic: DIY Anthropologie-Inspired Capiz Skull
Learn how I made this beautiful DIY Capiz Inspired Skull. My inspiration was this gorgeous Anthropologie Capiz Shell Skull that sells for a cool $98 USD or $146 CDN. I LOVE this pearlescent skull, but there’s no way I would pay that kind of money for one. So, it was time to put on my DIY thinking cap and figure out how to make a skull with those same qualities for cheaper!
I actually came up with TWO ideas for recreating the veiny, shimmery, pearl finish that I loved about this inspiration piece. So, let’s try them both and see which one we like best!

Tools and Materials List (Part 1)
Dollar store skulls
Sandpaper
Paper towel
Exacto knife
Drywall compound
Skull prep
The prep for the skulls was (almost) identical for both methods I attempted:
I took some sandpaper and sanded the skulls by hand to roughen the surface.
I used my super glue and accelerator kit to glue the jaws shut so they wouldn’t move.
I stuffed paper towel inside the mouth to fill in the gaps.
I cut a hole in the top of one skull with my Exacto knife so I could make it into a planter (only cut this hole if you want to do the same).
I covered both skulls in drywall compound as a base.
I sanded them by hand again once the compound was dry.

Silver metal leaf sheets technique
For the skull I planned to use as a planter, I used my first idea: silver metal sheets! The silver metal sheets would take the shape of the drywall compound underneath and (hopefully!) give me the textured look I was going for as well as the visible veining I wanted.
Tools and Materials List (Part 2)

How I did it
I applied the silver metal sheet adhesive with a craft paint brush in small sections.
I covered each section of adhesive with a silver metal leaf sheet and used the craft brush and my hand to smooth it in place and get it into every nook and cranny so it really took the shape of the skull.
Once the metal leaf was dry, I covered the entire skull with white gloss metallic acrylic paint (the paint is thin and allowed the shine and veining of the metal leaf to show through).
Once it was dry, I filled the skull with floral foam and arranged my craft store faux florals inside for a centerpiece that I think is to die for!

Iridescent epoxy pour technique

I had different plans for the second skull! I wanted to see if an iridescent epoxy would give me the look I wanted as well as the silver leaf technique did.
Tools and Materials List (Part 3)
Lipped plastic tray
Iridescent mica powder (white)
Popsicle stick
Stand for drying (glass with an open top)
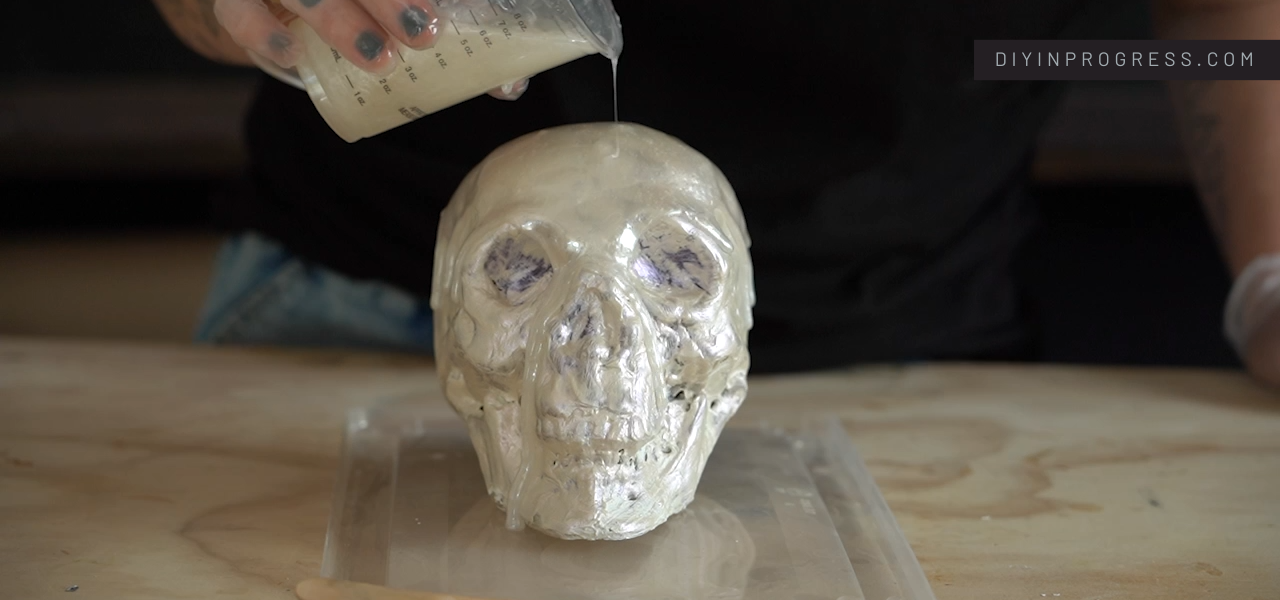
How I did it
I painted the entire skull with the white iridescent paint using a small craft brush that was able to get into all the little spaces on the surface of the skull.
I gave it two coats and let it dry.
I mixed my Art Resin epoxy parts A and B.
I added some iridescent white mica powder to achieve the shimmery sheen I was going for.
I set the skull on a lipped plastic tray.
I poured the epoxy over the skull, using a popsicle stick to scoop up the extra and pour it back over any missed areas.
I set it on top of an open glass to make sure most of the bottom was exposed to the air to dry.
Once it was dry, I applied another layer of the same iridescent white paint that I used for the other skull.
Then it was ready to style as part of a beautiful Halloween vignette!
I love how both my skulls turned out! If I HAD to pick a winner, I would say that the skull covered in metal leaf was closest to my inspiration piece. The foiling technique really gave the skull the veining lines that mimicked the capiz shell of the Anthropologie version. However, the epoxy piece really looked brilliant in its own way too. Neither skull was a failure and I will happily include them both in my Halloween decor this year!
Watch More Halloween Decor Ideas for Less Here!
Was it Cheaper?
Now, let’s get to the numbers. The metal leaf skull cost me a total of $51. This means I saved $94 by making it myself! The epoxy version cost me $59, meaning I saved $86 by DIYing it this way. So, either method will save you some big bucks and give you a gorgeous iridescent skull that will be the talk of your table this Halloween gathering.
Which technique do YOU like best? Will you try either of them this Halloween?
