How to Make a Wooden Sign with Cricut
Let’s talk about one of my favourite projects I made for my DIY Greenhouse! From the beginning, I had a vision of a wooden sign that would hang outside the door to welcome people inside. I also had a very specific idea for a custom sign that I would definitely not find in stores! I decided Cricut would be the best way to execute my plan and in this post, I'm going to show you exactly how I did it. Follow my step-by-step tutorial and make a welcome sign with me!
Which Cricut is best for making signs?
I decided to use one of my Cricut machines to create the decal for this sign. If you're thinking about purchasing a new machine and are wondering which one I used, I chose my Cricut Maker for this project. It's pretty amazing what the Maker can do! It can cut over 300 materials including fabrics, paper, leather, and even wood. I've used it for many other crafts like this in the past so I knew it was up for the job.
However, you do not NEED a Maker for this project! All we are doing is cutting some vinyl, so you don't need to worry about all the other fancy functions. Depending on the size of your sign and whether or not you care about using a mat, you can use any Cricut machine to print permanent vinyl. But I will say that the newer Cricut Venture will print a large sign easily with no mat required, which is a nice perk.
Can you use Cricut for wood signs? Does Cricut vinyl stick to wood?
Yes, you can use wood for your Cricut sign! Cricut vinyl sticks to a variety of surfaces, and wood is definitely one of them. In fact, if you start to look around and take note you will see many large DIY wood signs that used Cricut products for sale at craft fairs and in Etsy shops. It's a really common material for applying vinyl letters and images, so don't even think twice about it!
You have three different choices for using Cricut products on wood:
Heat transfer vinyl (HTV)
Permanent adhesive vinyl
Vinyl stencil and paint
Each of these different materials has their own pros and cons. In a nutshell, HTV could be considered the superior product for a few different reasons:
It does not require transfer tape and has its own liner instead
It is very thin so it appears to be painted on instead of stuck on like a decal for a slightly more professional look
You can lift and reposition it several times before you commit to ironing it on
But, there are many reasons people choose to work with permanent vinyl instead:
Cricut transfer tape is not expensive to buy and is easy to use
Permanent vinyl is available in more finishes, colours, and textures
It is more affordable to purchase and apply
The final look is still gorgeous
I chose to use permanent vinyl because it's cheaper to work with and does not require a second machine to apply it. A Cricut heat press is recommended to apply HTV (a regular iron is just not the same). This is an expensive extra cost if you do not already own a heat press! I also didn't mind if my sign looked like a decal since I was going for a rustic look anyway. And the reality is, permanent vinyl still looks great and is a perfect way to get the sign of your dreams! We are really talking about very subtle differences. If this is your first time working with vinyl to make your own Cricut signs, I recommend keeping it simple and using the permanent vinyl.
(I do love a good Cricut stencil, but I already used that idea for a different greenhouse project! Visit that post to see how I used a stencil, green paint, a little touch of gold, and a bathtub to create something lovely for the interior of my greenhouse.)

What do you need to make a wooden sign with Cricut?
Materials:
Hobby wood cut to size or a wooden shape of your choosing
White Exterior paint (or stain if that is your preference)
Rustoleum clear coat spray (outdoor)
(2) eye hooks
Equipment:
Cricut scraper
Scissors
Cricut weeding tool
Circular saw or jigsaw
Router
Roman router bit
Making the sign
The first step was creating the logo design I wanted - I made mine in Canva. Then, I uploaded it into Cricut Design Space (free with the purchase of your machine!) as a new project. I sized the design accordingly in cricut design space and prepped used black permanent vinyl that is made for exterior applications. (Cricut guarantees their exterior vinyl will last up to 3 years and I can personally back that claim! My greenhouse sign has been hanging for almost 3 years now. It has even survived 2 winters and it still looks perfect!) Then, all I had to do was click "Make it" and Cricut performed all the necessary cuts while I just sat back and watched.
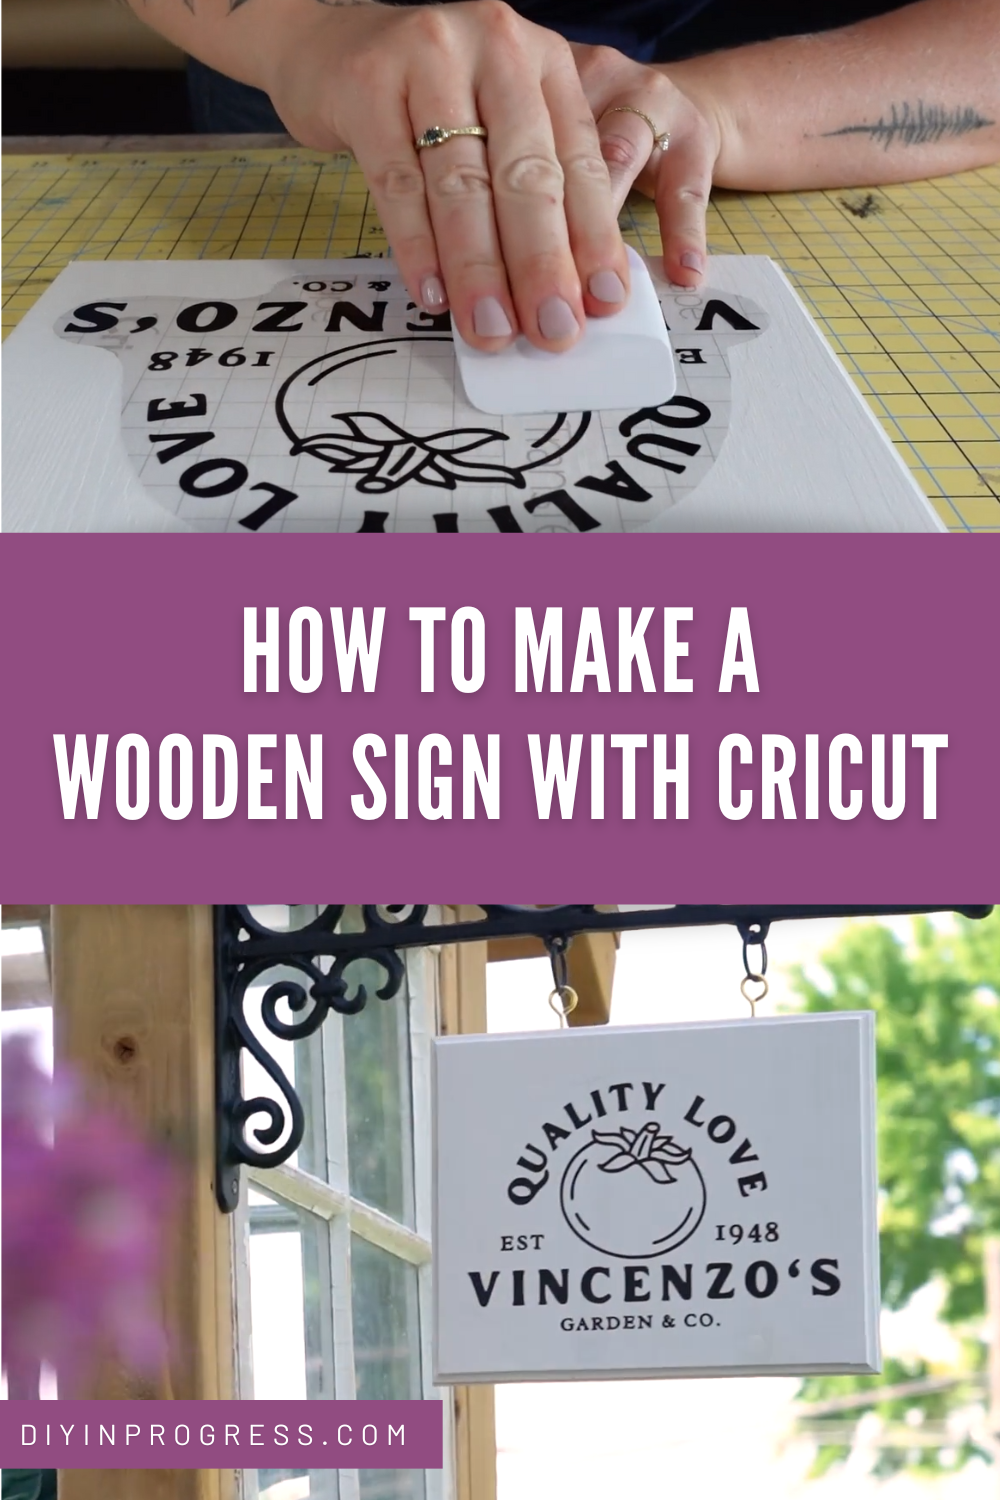
Once the Cricut vinyl was cut, I removed the large pieces around the outside using a pair of scissors. (As a side note: save all your scrap pieces no matter how small! You can always find a use for them elsewhere, and the Maker can cut smaller projects using a cutting mat. Don't waste anything!) I peeled the black vinyl away and then used my weeding tool to remove the extra vinyl around the little details. Then, I used my transfer tape to cover the logo and used my scraper tool to make sure the transfer paper was stuck down to every inch of the vinyl logo. I did this process twice because I wanted a double-sided sign. If you are planning to hang your sign on the wall or lean it against a mantel or shelf, you only need to cut one vinyl decal.

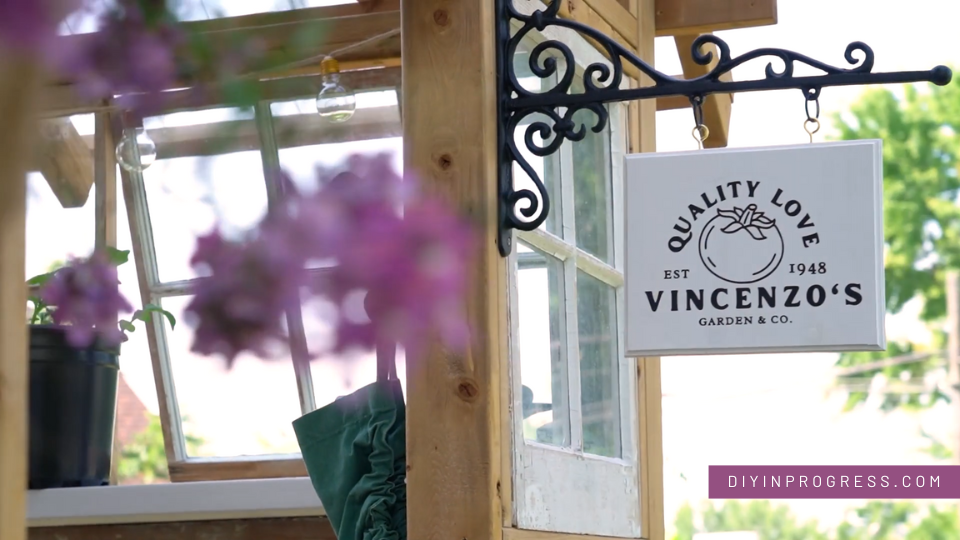
The next step was making the sign itself! I bought a metal hanger from Legacy Vintage Building Materials. It's cute, ornate, and perfect for my vision! I wanted to create an old-timey hanging shoppe sign, and this piece really added to that vibe. It only came in brown, which was not the look I wanted. So, I spray-painted it with flat black tremclad rust exterior spray paint.

What kind of wood do you use for signs?
Honestly, you can make your sign with ANY kind of wood, as long as you treat it properly for exterior conditions. I believe the best wood for making signs is laminated hobby wood. You can buy this product at your local hardware store in many different sizes.
I cut my piece of hobby pine into an 8x10 rectangle. To give it some personality, I bevelled the edges using my router with the Roman edge bit. Then, I sanded the edges smooth and gave it two coats of white exterior paint (I like Behr Porch & Patio Paint).

Once the paint was dry, it was time to apply my logo. I carefully peeled the backing paper off, leaving the logo stuck to the clear transfer paper. I then positioned it carefully in exactly the right place and transferred the logo onto the wood, using my scraper to ensure good adhesion of every piece of the vinyl.
Then, I peeled the transfer paper off and voila! A beautiful custom wood sign.

How do I keep my Cricut vinyl from peeling off wood?
The first thing you need to do to keep your vinyl looking new is prep your wood surface. If you choose not to go the hobby wood route and your wood is rough or dirty, your vinyl might bubble or peel. Sand down your wood so that it is smooth. A rough surface can cause bubbling and prevent proper adhesion. It also doesn't look as good because the bumps and dents will show up under your vinyl! I recommend a fresh layer of paint since vinyl sticks really nicely to this type of surface. I waited 24 hours before I applied my decal to the paint to ensure it was cured properly.
Then, apply your vinyl properly! Use a Cricut scraper to push down every last inch of your decal (just like I did). Take your time for this step and make sure the whole thing is properly adhered to the paint before you move on.
The next thing you can do to prevent your vinyl from peeling is to seal it. Mod Podge is a good option for indoor projects. But if you are planning to put your sign outside like I did, you might need something a bit more heavy-duty.
I sprayed the whole sign with a Rustoleum clear coat spray so that it would be protected from the elements. This meant it didn't have a matte finish as I had originally envisioned, but I actually didn't mind that little bit of shine!
This sign has spent three seasons outside now, including one Canadian winter. I can say that it has held up beautifully with no peeling at all! So, if you are planning to make a sign for outside, follow my recommendations for the best results.
The last step was attaching my sign to the greenhouse right by the front door. I added gold eye hooks to the top edge and hung it from the gorgeous metal hanger. Then, I used some wood screws and my impact to attach the hanger to the outside of my wooden greenhouse, right by the door. I think I picked a great place for the sign and it looks so welcoming.
That's it! That's how you make a beautiful custom wooden sign with your Cricut machine. This was such a fun project and a simple one too. Cricut makes it so easy to customize the sign to say whatever you want, and I love that the entire design can be created and executed right in Design Space. Do you have any Cricut wood signs to show off? Tag me @diydanie or leave a pic in the comments!